1 為什麼需要關聯?
在Rails中,關聯是兩個Active Record模型之間的連接。為什麼我們需要模型之間的關聯?因為它們使得代碼中的常見操作更加簡單和容易。
例如,考慮一個包含作者模型和書籍模型的簡單Rails應用程序。每個作者可以有多本書。
如果沒有關聯,模型的聲明將如下所示:
class Author < ApplicationRecord
end

class Book < ApplicationRecord
end
現在,假設我們想為現有作者添加一本新書。我們需要這樣做:
@book = Book.create(published_at: Time.now, author_id: @author.id)
或者考慮刪除一個作者,並確保其所有書籍也被刪除:
@books = Book.where(author_id: @author.id)
@books.each do |book|
  book.destroy
end
@author.destroy
通過Active Record關聯,我們可以通過聲明告訴Rails兩個模型之間存在連接,從而簡化這些操作和其他操作。以下是設置作者和書籍的修訂代碼:
class Author < ApplicationRecord
  has_many :books, dependent: :destroy
end

class Book < ApplicationRecord
  belongs_to :author
end
通過這個改變,為特定作者創建一本新書變得更容易:
@book = @author.books.create(published_at: Time.now)
刪除一個作者及其所有書籍變得更容易:
@author.destroy
要了解更多不同類型的關聯,請閱讀本指南的下一節。接下來是一些有關處理關聯的技巧和技巧,然後是Rails中關聯的方法和選項的完整參考。
2 關聯的類型
Rails支持六種類型的關聯,每種關聯都有特定的用例。
以下是所有支持的類型的列表,並附有鏈接到其API文檔,以獲取有關如何使用它們、它們的方法參數等更詳細的信息。
關聯使用宏風格的調用來實現,因此您可以聲明性地向模型中添加功能。例如,通過聲明一個模型belongs_to另一個模型,您指示Rails在兩個模型的實例之間維護主鍵-外鍵信息,並且還可以為模型添加一些實用方法。
在本指南的其餘部分,您將學習如何聲明和使用各種形式的關聯。但首先,快速介紹每種關聯類型適用的情況。
2.1 belongs_to 關聯
belongs_to 關聯建立了與另一個模型的連接,以便聲明模型的每個實例“屬於”另一個模型的一個實例。例如,如果您的應用程序包含作者和書籍,並且每本書只能分配給一位作者,您可以這樣聲明書籍模型:
class Book < ApplicationRecord
  belongs_to :author
end
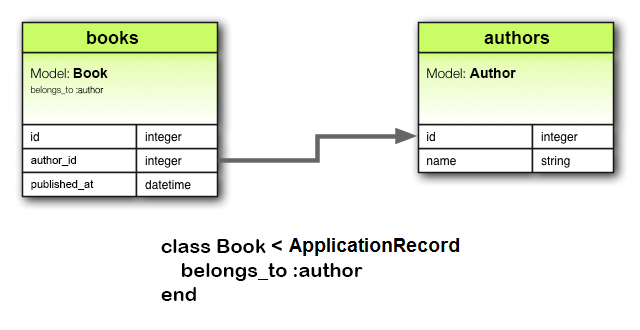
注意:belongs_to 關聯必須使用單數形式。如果在上面的示例中的 Book 模型的 author 關聯中使用了復數形式,並且嘗試通過 Book.create(authors: @author) 創建實例,則會告訴您存在“未初始化的常量Book::Authors”。這是因為Rails會自動從關聯名稱推斷出類名。如果關聯名稱錯誤地使用了復數形式,那麼推斷出的類名也會錯誤地使用復數形式。
相應的遷移可能如下所示:
class CreateBooks < ActiveRecord::Migration[7.1]
  def change
    create_table :authors do |t|
      t.string :name
      t.timestamps
    end

    create_table :books do |t|
      t.belongs_to :author
      t.datetime :published_at
      t.timestamps
    end
  end
end
當單獨使用 belongs_to 時,它產生單向的一對一連接。因此,上面示例中的每本書“知道”它的作者,但作者不知道他們的書籍。
要設置雙向關聯 - 在其他模型上使用 belongs_to 結合 has_one 或 has_many,在這種情況下是Author模型。
如果將 optional 設置為true,belongs_to 不會確保引用一致性,因此根據用例,您可能還需要在引用列上添加數據庫級外鍵約束,如下所示:
ruby
create_table :books do |t|
  t.belongs_to :author, foreign_key: true
  # ...
end
2.2 has_one 關聯
has_one 關聯表示另一個模型對此模型有一個引用。可以通過此關聯獲取該模型。
例如,如果應用程序中的每個供應商只有一個帳戶,則可以像這樣聲明供應商模型:
class Supplier < ApplicationRecord
  has_one :account
end
與 belongs_to 的主要區別在於,連接列 supplier_id 位於其他表中:
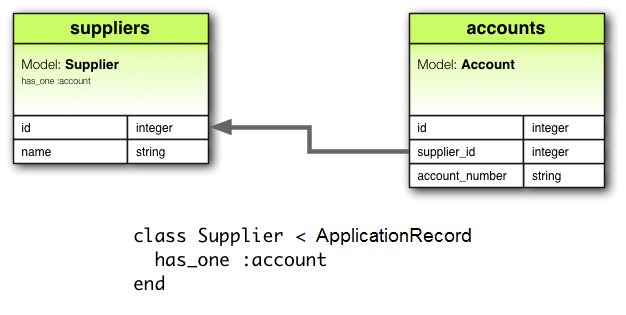
相應的遷移可能如下所示:
class CreateSuppliers < ActiveRecord::Migration[7.1]
  def change
    create_table :suppliers do |t|
      t.string :name
      t.timestamps
    end

    create_table :accounts do |t|
      t.belongs_to :supplier
      t.string :account_number
      t.timestamps
    end
  end
end
根據用例的不同,您可能還需要在帳戶表的供應商列上創建唯一索引和/或外鍵約束。在這種情況下,列定義可能如下所示:
create_table :accounts do |t|
  t.belongs_to :supplier, index: { unique: true }, foreign_key: true
  # ...
end
當與其他模型上的 belongs_to 結合使用時,此關聯可以是雙向的。
2.3 has_many 關聯
has_many 關聯與 has_one 類似,但表示與另一個模型之間的一對多關係。通常會在 belongs_to 關聯的“另一邊”找到此關聯。此關聯表示每個模型實例都可以有零個或多個另一個模型的實例。例如,在包含作者和書籍的應用程序中,可以像這樣聲明作者模型:
class Author < ApplicationRecord
  has_many :books
end
注意:聲明 has_many 關聯時,另一個模型的名稱會被複數化。
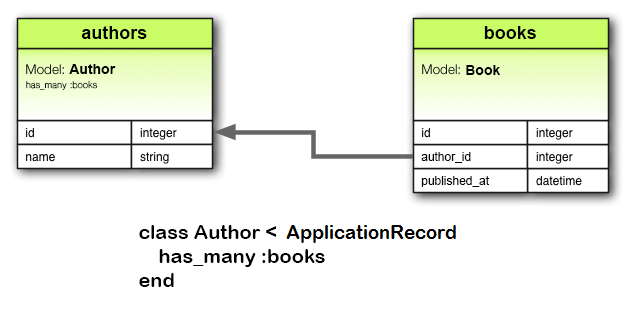
相應的遷移可能如下所示:
class CreateAuthors < ActiveRecord::Migration[7.1]
  def change
    create_table :authors do |t|
      t.string :name
      t.timestamps
    end

    create_table :books do |t|
      t.belongs_to :author
      t.datetime :published_at
      t.timestamps
    end
  end
end
根據用例,通常建議在書籍表的作者列上創建一個非唯一索引,並可選地在作者列上創建外鍵約束:
create_table :books do |t|
  t.belongs_to :author, index: true, foreign_key: true
  # ...
end
2.4 has_many :through 關聯
has_many :through 關聯通常用於設置與另一個模型之間的多對多關係。此關聯表示聲明模型可以通過第三個模型進行匹配,與另一個模型的零個或多個實例相關聯。例如,考慮一個醫療機構,患者可以預約看醫生。相關的關聯聲明可能如下所示:
class Physician < ApplicationRecord
  has_many :appointments
  has_many :patients, through: :appointments
end

class Appointment < ApplicationRecord
  belongs_to :physician
  belongs_to :patient
end

class Patient < ApplicationRecord
  has_many :appointments
  has_many :physicians, through: :appointments
end
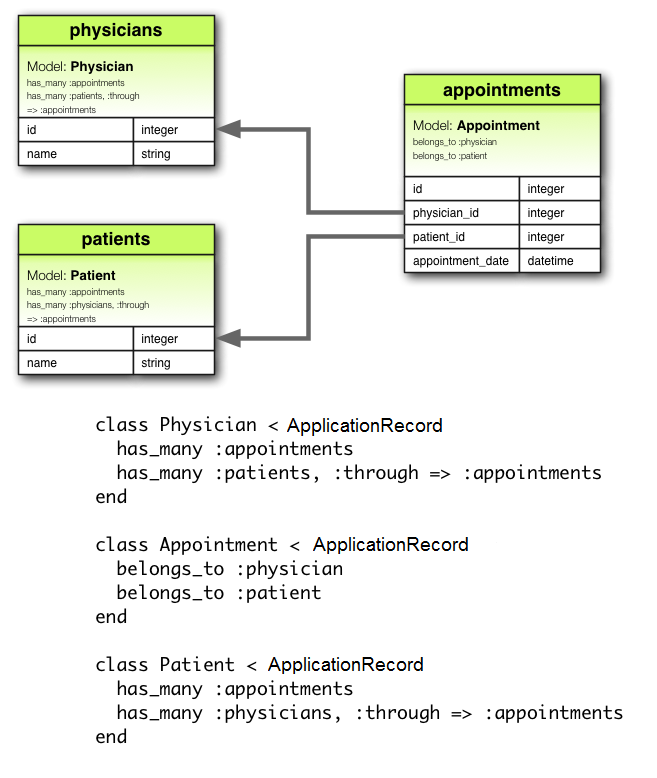
相應的遷移可能如下所示:
class CreateAppointments < ActiveRecord::Migration[7.1]
  def change
    create_table :physicians do |t|
      t.string :name
      t.timestamps
    end

    create_table :patients do |t|
      t.string :name
      t.timestamps
    end

    create_table :appointments do |t|
      t.belongs_to :physician
      t.belongs_to :patient
      t.datetime :appointment_date
      t.timestamps
    end
  end
end
通過 has_many 關聯方法可以管理聯接模型的集合。
例如,如果您分配:
physician.patients = patients
則會自動為新關聯的對象創建聯接模型。 如果以前存在的一些對象現在缺失,則它們的聯接行將自動刪除。
警告:自動刪除聯接模型是直接的,不會觸發銷毀回調。
has_many :through 關聯還可用於通過嵌套的 has_many 關聯設置“快捷方式”。例如,如果一個文檔有多個章節,一個章節有多個段落,有時您可能希望獲取文檔中所有段落的簡單集合。可以這樣設置:
class Document < ApplicationRecord
  has_many :sections
  has_many :paragraphs, through: :sections
end

class Section < ApplicationRecord
  belongs_to :document
  has_many :paragraphs
end

class Paragraph < ApplicationRecord
  belongs_to :section
end
指定 through: :sections 後,Rails 現在可以理解:
@document.paragraphs
2.5 has_one :through 關聯
has_one :through 關聯設置了一對一的連接與另一個模型。此關聯表示聲明模型可以通過第三個模型進行匹配,與另一個模型的一個實例相關聯。
例如,如果每個供應商都有一個帳戶,每個帳戶與一個帳戶歷史相關聯,則供應商模型可能如下所示:
```ruby
class Supplier < ApplicationRecord
has_one :account
has_one :account_history, through: :account
end
class Account < ApplicationRecord belongs_to :supplier has_one :account_history end
class AccountHistory < ApplicationRecord belongs_to :account end ```
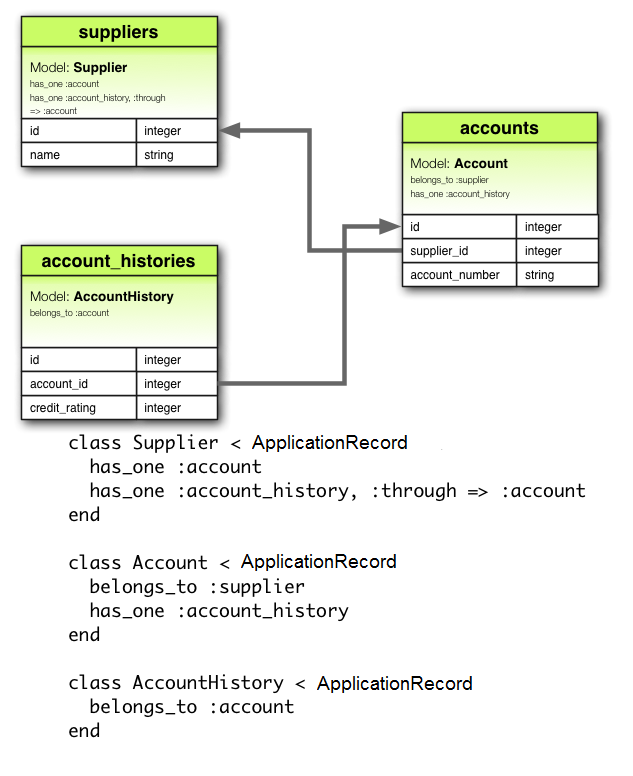
相對應的遷移可能如下所示:
class CreateAccountHistories < ActiveRecord::Migration[7.1]
  def change
    create_table :suppliers do |t|
      t.string :name
      t.timestamps
    end

    create_table :accounts do |t|
      t.belongs_to :supplier
      t.string :account_number
      t.timestamps
    end

    create_table :account_histories do |t|
      t.belongs_to :account
      t.integer :credit_rating
      t.timestamps
    end
  end
end
2.6 has_and_belongs_to_many 關聯
has_and_belongs_to_many 關聯在兩個模型之間創建一個直接的多對多連接,沒有中介模型。
此關聯表示聲明模型的每個實例引用另一個模型的零個或多個實例。
例如,如果您的應用程序包含組件和零件,每個組件有多個零件,每個零件出現在多個組件中,您可以這樣聲明模型:
class Assembly < ApplicationRecord
  has_and_belongs_to_many :parts
end

class Part < ApplicationRecord
  has_and_belongs_to_many :assemblies
end
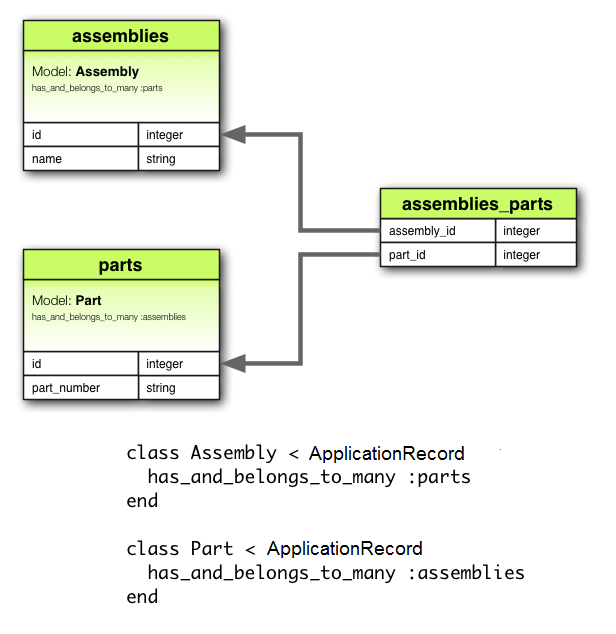
相對應的遷移可能如下所示:
class CreateAssembliesAndParts < ActiveRecord::Migration[7.1]
  def change
    create_table :assemblies do |t|
      t.string :name
      t.timestamps
    end

    create_table :parts do |t|
      t.string :part_number
      t.timestamps
    end

    create_table :assemblies_parts, id: false do |t|
      t.belongs_to :assembly
      t.belongs_to :part
    end
  end
end
2.7 選擇 belongs_to 和 has_one 之間的區別
如果您想在兩個模型之間建立一對一的關係,您需要在其中一個模型中添加 belongs_to,在另一個模型中添加 has_one。您如何知道哪個是哪個?
區別在於您放置外鍵的位置(它放在聲明 belongs_to 關聯的類的表上),但您也應該對數據的實際含義進行一些思考。has_one 關係表示某物的一部分是您的 - 也就是說,某物指向您。例如,說一個供應商擁有一個帳戶比說一個帳戶擁有一個供應商更有意義。這表明正確的關係如下:
class Supplier < ApplicationRecord
  has_one :account
end

class Account < ApplicationRecord
  belongs_to :supplier
end
相對應的遷移可能如下所示:
class CreateSuppliers < ActiveRecord::Migration[7.1]
  def change
    create_table :suppliers do |t|
      t.string :name
      t.timestamps
    end

    create_table :accounts do |t|
      t.bigint  :supplier_id
      t.string  :account_number
      t.timestamps
    end

    add_index :accounts, :supplier_id
  end
end
注意:使用 t.bigint :supplier_id 可以使外鍵命名明顯且明確。在當前版本的 Rails 中,您可以使用 t.references :supplier 來抽象掉這個實現細節。
2.8 選擇 has_many :through 和 has_and_belongs_to_many 之間的區別
Rails 提供了兩種不同的方法來聲明模型之間的多對多關係。第一種方法是使用 has_and_belongs_to_many,它允許您直接建立關聯:
class Assembly < ApplicationRecord
  has_and_belongs_to_many :parts
end

class Part < ApplicationRecord
  has_and_belongs_to_many :assemblies
end
聲明多對多關係的第二種方法是使用 has_many :through。這通過一個連接模型間接建立關聯:
class Assembly < ApplicationRecord
  has_many :manifests
  has_many :parts, through: :manifests
end

class Manifest < ApplicationRecord
  belongs_to :assembly
  belongs_to :part
end

class Part < ApplicationRecord
  has_many :manifests
  has_many :assemblies, through: :manifests
end
最簡單的經驗法則是,如果您需要將關聯模型作為獨立實體進行操作,則應該設置 has_many :through 關聯。如果您不需要對關聯模型進行任何操作,則設置 has_and_belongs_to_many 關聯可能更簡單(但您需要記住在數據庫中創建連接表)。
如果您需要在連接模型上進行驗證、回調或額外屬性,則應該使用 has_many :through。
2.9 多態關聯
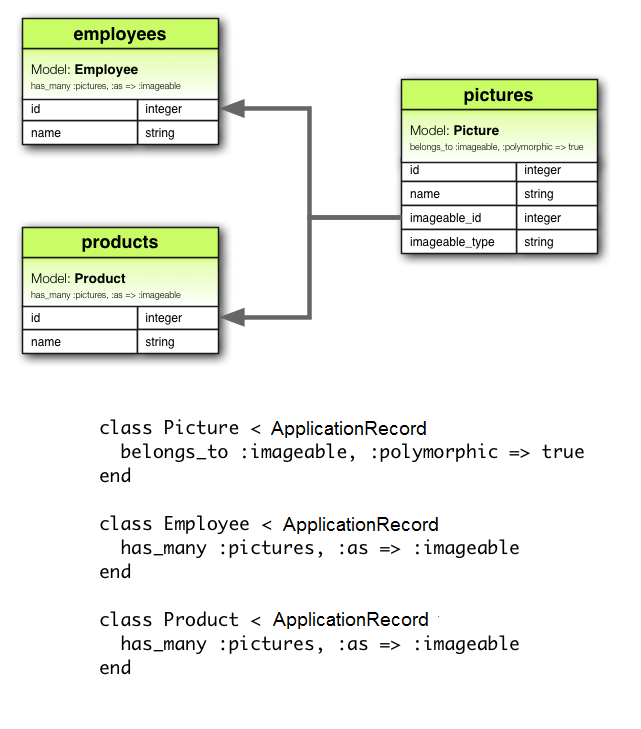
關聯的稍微高級的變化是 多態關聯。使用多態關聯,一個模型可以屬於多個其他模型,並且只有一個關聯。例如,您可能有一個圖片模型,它可以屬於員工模型或產品模型。這是如何聲明的:
class Picture < ApplicationRecord
  belongs_to :imageable, polymorphic: true
end

class Employee < ApplicationRecord
  has_many :pictures, as: :imageable
end

class Product < ApplicationRecord
  has_many :pictures, as: :imageable
end
您可以將多態的 belongs_to 聲明視為設置一個任何其他模型都可以使用的接口。從 Employee 模型的實例,您可以檢索圖片的集合:@employee.pictures。
同樣地,您可以檢索@product.pictures。
如果您有Picture模型的實例,可以通過@picture.imageable獲取其父級。為了使其工作,您需要在聲明多態接口的模型中聲明外鍵列和類型列:
class CreatePictures < ActiveRecord::Migration[7.1]
  def change
    create_table :pictures do |t|
      t.string  :name
      t.bigint  :imageable_id
      t.string  :imageable_type
      t.timestamps
    end

    add_index :pictures, [:imageable_type, :imageable_id]
  end
end
使用t.references形式可以簡化此遷移:
class CreatePictures < ActiveRecord::Migration[7.1]
  def change
    create_table :pictures do |t|
      t.string :name
      t.references :imageable, polymorphic: true
      t.timestamps
    end
  end
end
2.10 自關聯
在設計數據模型時,有時會發現一個模型應該與自身有關聯。例如,您可能希望將所有員工存儲在單個數據庫模型中,但能夠追蹤經理和下屬之間的關係。這種情況可以使用自關聯關聯來建模:
class Employee < ApplicationRecord
  has_many :subordinates, class_name: "Employee",
                          foreign_key: "manager_id"

  belongs_to :manager, class_name: "Employee", optional: true
end
使用此設置,您可以檢索@employee.subordinates和@employee.manager。
在遷移/模式中,您將向模型本身添加一個引用列。
class CreateEmployees < ActiveRecord::Migration[7.1]
  def change
    create_table :employees do |t|
      t.references :manager, foreign_key: { to_table: :employees }
      t.timestamps
    end
  end
end
注意:傳遞給foreign_key等的to_table選項等在SchemaStatements#add_reference中有解釋。
3 提示、技巧和警告
以下是您在Rails應用程序中有效使用Active Record關聯的一些事項:
- 控制緩存
- 避免名稱衝突
- 更新模式
- 控制關聯範圍
- 雙向關聯
3.1 控制緩存
所有關聯方法都建立在緩存的基礎上,這使得最近一次查詢的結果可用於進一步操作。緩存甚至在方法之間共享。例如:
# 從數據庫檢索書籍
author.books.load

# 使用書籍的緩存副本
author.books.size

# 使用書籍的緩存副本
author.books.empty?
但是,如果您想重新加載緩存,因為數據可能已被應用程序的其他部分更改,只需在關聯上調用reload:
# 從數據庫檢索書籍
author.books.load

# 使用書籍的緩存副本
author.books.size

# 丟棄書籍的緩存副本並返回數據庫
author.books.reload.empty?
3.2 避免名稱衝突
您不能隨意為關聯使用任何名稱。因為創建關聯會向模型添加具有該名稱的方法,所以為關聯指定已在ActiveRecord::Base的實例方法中使用的名稱是不好的做法。關聯方法將覆蓋基礎方法並導致錯誤。例如,attributes或connection是不適合作為關聯名稱的。
3.3 更新模式
關聯非常有用,但它們並不是魔法。您負責維護數據庫模式以匹配關聯。實際上,這意味著兩件事,具體取決於您創建的關聯類型。對於belongs_to關聯,您需要創建外鍵,對於has_and_belongs_to_many關聯,您需要創建適當的連接表。
3.3.1 為belongs_to關聯創建外鍵
當您聲明belongs_to關聯時,需要根據需要創建外鍵。例如,考慮以下模型:
class Book < ApplicationRecord
  belongs_to :author
end
此聲明需要在books表中創建相應的外鍵列。對於全新的表,遷移可能如下所示:
class CreateBooks < ActiveRecord::Migration[7.1]
  def change
    create_table :books do |t|
      t.datetime   :published_at
      t.string     :book_number
      t.references :author
    end
  end
end
而對於現有表,可能如下所示:
class AddAuthorToBooks < ActiveRecord::Migration[7.1]
  def change
    add_reference :books, :author
  end
end
注意:如果您希望在數據庫層面強制執行引用完整性,請將foreign_key: true選項添加到上述“引用”列聲明中。
3.3.2 為has_and_belongs_to_many關聯創建連接表
如果您創建了has_and_belongs_to_many關聯,您需要明確創建連接表。除非使用:join_table選項明確指定連接表的名稱,否則Active Record將使用類名的字典順序創建名稱。因此,作者和書籍模型之間的連接將給出默認連接表名稱“authors_books”,因為“a”在字典順序中優於“b”。
警告:模型名稱之間的優先順序是使用<=>運算符計算的String。這意味著如果字符串的長度不同,且在比較到最短長度時字符串相等,則較長的字符串被認為具有比較短的字符串更高的字典優先順序。例如,人們會期望表格"paper_boxes"和"papers"生成的聯接表名稱為"papers_paper_boxes",因為名稱"paper_boxes"的長度較長,但實際上生成的聯接表名稱為"paper_boxes_papers"(因為在常見的編碼中,底線'_'在字典排序中比's'小)。
無論名稱如何,您都必須手動生成具有適當遷移的聯接表。例如,考慮以下關聯:
class Assembly < ApplicationRecord
  has_and_belongs_to_many :parts
end

class Part < ApplicationRecord
  has_and_belongs_to_many :assemblies
end
這些關聯需要通過遷移來支持創建assemblies_parts表。此表應該在沒有主鍵的情況下創建:
class CreateAssembliesPartsJoinTable < ActiveRecord::Migration[7.1]
  def change
    create_table :assemblies_parts, id: false do |t|
      t.bigint :assembly_id
      t.bigint :part_id
    end

    add_index :assemblies_parts, :assembly_id
    add_index :assemblies_parts, :part_id
  end
end
我們將id: false傳遞給create_table,因為該表不表示模型。這對於關聯正常工作是必需的。如果您在has_and_belongs_to_many關聯中觀察到任何奇怪的行為,例如錯誤的模型ID或關於衝突ID的異常,則有可能忘記了這一點。
為了簡化,您也可以使用create_join_table方法:
class CreateAssembliesPartsJoinTable < ActiveRecord::Migration[7.1]
  def change
    create_join_table :assemblies, :parts do |t|
      t.index :assembly_id
      t.index :part_id
    end
  end
end
3.4 控制關聯範圍
默認情況下,關聯僅在當前模塊的範圍內查找對象。這在您在模塊內聲明Active Record模型時可能很重要。例如:
module MyApplication
  module Business
    class Supplier < ApplicationRecord
      has_one :account
    end

    class Account < ApplicationRecord
      belongs_to :supplier
    end
  end
end
這將正常工作,因為Supplier和Account類都在同一範圍內定義。但是以下情況將不起作用,因為Supplier和Account在不同的範圍內定義:
module MyApplication
  module Business
    class Supplier < ApplicationRecord
      has_one :account
    end
  end

  module Billing
    class Account < ApplicationRecord
      belongs_to :supplier
    end
  end
end
要將模型與不同命名空間中的模型關聯起來,必須在關聯聲明中指定完整的類名:
module MyApplication
  module Business
    class Supplier < ApplicationRecord
      has_one :account,
        class_name: "MyApplication::Billing::Account"
    end
  end

  module Billing
    class Account < ApplicationRecord
      belongs_to :supplier,
        class_name: "MyApplication::Business::Supplier"
    end
  end
end
3.5 雙向關聯
關聯通常在兩個方向上工作,需要在兩個不同的模型上聲明:
class Author < ApplicationRecord
  has_many :books
end

class Book < ApplicationRecord
  belongs_to :author
end
Active Record將嘗試根據關聯名稱自動識別這兩個模型共享的雙向關聯。這些信息允許Active Record:
避免對已加載的數據進行不必要的查詢:
irb> author = Author.first irb> author.books.all? do |book| irb> book.author.equal?(author) # 這裡不執行額外的查詢 irb> end => true避免不一致的數據(因為只有一個
Author對象被加載):irb> author = Author.first irb> book = author.books.first irb> author.name == book.author.name => true irb> author.name = "Changed Name" irb> author.name == book.author.name => true在更多情況下自動保存關聯:
irb> author = Author.new irb> book = author.books.new irb> book.save! irb> book.persisted? => true irb> author.persisted? => trueirb> book = Book.new irb> book.valid? => false irb> book.errors.full_messages => ["Author must exist"] irb> author = Author.new irb> book = author.books.new irb> book.valid? => true
Active Record支持對大多數具有標準名稱的關聯進行自動識別。但是,包含:through或:foreign_key選項的雙向關聯將不會自動識別。
對相反關聯的自定義作用域也會阻止自動識別,就像對關聯本身的自定義作用域一樣,除非將config.active_record.automatic_scope_inversing設置為true(新應用程序的默認值)。
例如,考慮以下模型聲明:
class Author < ApplicationRecord
  has_many :books
end

class Book < ApplicationRecord
  belongs_to :writer, class_name: 'Author', foreign_key: 'author_id'
end
由於:foreign_key選項,Active Record將不再自動識別雙向關聯。這可能會導致應用程序:
* 執行不必要的查詢以獲取相同的數據(在此示例中導致N+1個查詢):
```irb
irb> author = Author.first
irb> author.books.any? do |book|
irb>   book.author.equal?(author) # 每本書都執行一個作者查詢
irb> end
=> false
```
引用具有不一致數據的模型的多個副本:
irb> author = Author.first irb> book = author.books.first irb> author.name == book.author.name => true irb> author.name = "Changed Name" irb> author.name == book.author.name => false未能自動保存關聯:
irb> author = Author.new irb> book = author.books.new irb> book.save! irb> book.persisted? => true irb> author.persisted? => false未能驗證存在或不存在:
irb> author = Author.new
irb> book = author.books.new
irb> book.valid?
=> false
irb> book.errors.full_messages
=> ["作者必須存在"]
Active Record 提供了 :inverse_of 選項,因此您可以明確聲明雙向關聯:
class Author < ApplicationRecord
  has_many :books, inverse_of: 'writer'
end

class Book < ApplicationRecord
  belongs_to :writer, class_name: 'Author', foreign_key: 'author_id'
end
通過在 has_many 關聯聲明中包含 :inverse_of 選項,Active Record 現在將識別雙向關聯並像上面的初始示例一樣運作。
4 詳細的關聯參考
以下各節詳細介紹了每種類型的關聯,包括它們添加的方法以及在聲明關聯時可以使用的選項。
4.1 belongs_to 關聯參考
從數據庫的角度來看,belongs_to 關聯表示該模型的表包含一個表示對另一個表的引用的列。
這可以用於設置一對一或一對多的關係,具體取決於設置。
如果另一個類的表在一對一關係中包含引用,則應改用 has_one。
4.1.1 belongs_to 添加的方法
當您聲明 belongs_to 關聯時,聲明類會自動獲得與關聯相關的 8 個方法:
associationassociation=(associate)build_association(attributes = {})create_association(attributes = {})create_association!(attributes = {})reload_associationreset_associationassociation_changed?association_previously_changed?
在所有這些方法中,association 會被替換為作為 belongs_to 的第一個參數傳遞的符號。例如,給定以下聲明:
class Book < ApplicationRecord
  belongs_to :author
end
Book 模型的每個實例都將擁有這些方法:
authorauthor=build_authorcreate_authorcreate_author!reload_authorreset_authorauthor_changed?author_previously_changed?
注意:在初始化新的 has_one 或 belongs_to 關聯時,您必須使用 build_ 前綴來構建關聯,而不是用於 has_many 或 has_and_belongs_to_many 關聯的 association.build 方法。要創建一個,請使用 create_ 前綴。
4.1.1.1 association
association 方法返回關聯的對象(如果有)。如果未找到關聯的對象,則返回 nil。
@author = @book.author
如果已經從數據庫中檢索到此對象的關聯對象,則將返回緩存版本。要覆蓋此行為(並強制進行數據庫讀取),請在父對象上調用 #reload_association。
@author = @book.reload_author
要卸載關聯對象的緩存版本(導致下一次訪問(如果有)從數據庫中查詢它),請在父對象上調用 #reset_association。
@book.reset_author
4.1.1.2 association=(associate)
association= 方法將一個關聯對象分配給此對象。在幕後,這意味著從關聯對象中提取主鍵,並將此對象的外鍵設置為相同的值。
@book.author = @author
4.1.1.3 build_association(attributes = {})
build_association 方法返回關聯類型的新對象。此對象將從傳遞的屬性實例化,並且通過此對象的外鍵設置連接,但關聯對象尚未保存。
@author = @book.build_author(author_number: 123,
                             author_name: "John Doe")
4.1.1.4 create_association(attributes = {})
create_association 方法返回關聯類型的新對象。此對象將從傳遞的屬性實例化,通過此對象的外鍵設置連接,並且一旦通過關聯模型上指定的所有驗證,關聯對象將被保存。
@author = @book.create_author(author_number: 123,
                              author_name: "John Doe")
4.1.1.5 create_association!(attributes = {})
與上面的 create_association 相同,但如果記錄無效,則引發 ActiveRecord::RecordInvalid。
4.1.1.6 association_changed?
association_changed? 方法在分配新的關聯對象並在下一次保存時更新外鍵時返回 true。
```ruby
@book.author # => #
@book.author = Author.second # => #
@book.save! @book.author_changed? # => false ```
4.1.1.7 association_previously_changed?
association_previously_changed? 方法會在前一次儲存更新關聯到新的關聯物件時回傳 true。
@book.author # => #<Author author_number: 123, author_name: "John Doe">
@book.author_previously_changed? # => false

@book.author = Author.second # => #<Author author_number: 456, author_name: "Jane Smith">
@book.save!
@book.author_previously_changed? # => true
4.1.2 belongs_to 的選項
雖然 Rails 在大多數情況下使用智能預設值,可以很好地運作,但有時您可能想要自定義 belongs_to 關聯的行為。通過在建立關聯時傳遞選項和範圍塊,可以輕鬆實現這些自定義。例如,這個關聯使用了兩個這樣的選項:
class Book < ApplicationRecord
  belongs_to :author, touch: :books_updated_at,
    counter_cache: true
end
belongs_to 關聯支援以下選項:
:autosave:class_name:counter_cache:dependent:foreign_key:primary_key:inverse_of:polymorphic:touch:validate:optional
4.1.2.1 :autosave
如果將 :autosave 選項設置為 true,則在保存父對象時,Rails 將保存任何已加載的關聯成員並銷毀標記為銷毀的成員。將 :autosave 設置為 false 不等於不設置 :autosave 選項。如果未出現 :autosave 選項,則新的關聯對象將被保存,但更新的關聯對象將不會被保存。
4.1.2.2 :class_name
如果其他模型的名稱無法從關聯名稱推斷出來,可以使用 :class_name 選項來提供模型名稱。例如,如果一本書屬於一位作者,但實際包含作者的模型的名稱是 Patron,則可以這樣設置:
class Book < ApplicationRecord
  belongs_to :author, class_name: "Patron"
end
4.1.2.3 :counter_cache
counter_cache 選項可用於使查找屬於關聯對象的數量更有效率。考慮以下模型:
class Book < ApplicationRecord
  belongs_to :author
end

class Author < ApplicationRecord
  has_many :books
end
使用這些聲明,要求 @author.books.size 的值需要向數據庫發出 COUNT(*) 查詢。為了避免此調用,可以在 屬於 模型中添加計數緩存:
class Book < ApplicationRecord
  belongs_to :author, counter_cache: true
end

class Author < ApplicationRecord
  has_many :books
end
使用這個聲明,Rails 會保持緩存值的最新狀態,然後在 size 方法的回應中返回該值。
雖然 :counter_cache 選項是在包含 belongs_to 聲明的模型上指定的,但實際的列必須添加到 關聯 (has_many) 模型中。在上面的例子中,您需要在 Author 模型中添加一個名為 books_count 的列。
您可以通過在 counter_cache 聲明中指定自定義列名而覆蓋默認列名。例如,使用 count_of_books 而不是 books_count:
class Book < ApplicationRecord
  belongs_to :author, counter_cache: :count_of_books
end

class Author < ApplicationRecord
  has_many :books
end
注意:只需要在關聯的 belongs_to 那一邊指定 :counter_cache 選項。
計數緩存列通過 attr_readonly 添加到所有者模型的只讀屬性列表中。
如果由於某種原因更改了所有者模型的主鍵的值,並且沒有同時更新計數模型的外鍵,則計數緩存可能會包含過時的數據。換句話說,任何孤立的模型仍然會計入計數器。要修復過時的計數緩存,請使用 reset_counters。
4.1.2.4 :dependent
如果將 :dependent 選項設置為:
:destroy,當對象被銷毀時,將調用其關聯對象的destroy方法。:delete,當對象被銷毀時,將直接從數據庫中刪除其所有關聯對象,而不調用其destroy方法。:destroy_async:當對象被銷毀時,會將一個ActiveRecord::DestroyAssociationAsyncJob作業加入隊列,該作業將調用其關聯對象的destroy方法。必須設置 Active Job 才能使用此選項。如果關聯由數據庫中的外鍵約束支持,請勿使用此選項。外鍵約束操作將在刪除所有者的同一事務中執行。 警告:在一個與另一個類的has_many關聯相連的belongs_to關聯上指定此選項是不合適的。這樣做可能導致數據庫中出現孤立的記錄。
4.1.2.5 :foreign_key
按照慣例,Rails假設在這個模型上用於保存外鍵的列名是關聯名加上後綴_id。foreign_key選項允許你直接設置外鍵的名稱:
class Book < ApplicationRecord
  belongs_to :author, class_name: "Patron",
                      foreign_key: "patron_id"
end
提示:無論如何,Rails不會為你創建外鍵列。你需要在遷移中明確定義它們。
4.1.2.6 :primary_key
按照慣例,Rails假設id列用於保存表的主鍵。primary_key選項允許你指定不同的列。
例如,假設我們有一個users表,主鍵是guid。如果我們想要一個單獨的todos表來保存guid列中的外鍵user_id,那麼我們可以使用primary_key來實現:
class User < ApplicationRecord
  self.primary_key = 'guid' # 主鍵是guid而不是id
end

class Todo < ApplicationRecord
  belongs_to :user, primary_key: 'guid'
end
當我們執行@user.todos.create時,@todo記錄的user_id值將是@user的guid值。
4.1.2.7 :inverse_of
inverse_of選項指定與此關聯相反的has_many或has_one關聯的名稱。詳細信息請參見雙向關聯部分。
class Author < ApplicationRecord
  has_many :books, inverse_of: :author
end

class Book < ApplicationRecord
  belongs_to :author, inverse_of: :books
end
4.1.2.8 :polymorphic
將true傳遞給polymorphic選項表示這是一個多態關聯。多態關聯在本指南的多態關聯部分中有詳細討論。
4.1.2.9 :touch
如果將touch選項設置為true,則在保存或刪除此對象時,關聯對象上的updated_at或updated_on時間戳將被設置為當前時間:
class Book < ApplicationRecord
  belongs_to :author, touch: true
end

class Author < ApplicationRecord
  has_many :books
end
在這種情況下,保存或刪除一本書將更新關聯作者上的時間戳。你也可以指定要更新的特定時間戳屬性:
class Book < ApplicationRecord
  belongs_to :author, touch: :books_updated_at
end
4.1.2.10 :validate
如果將validate選項設置為true,則在保存此對象時,新的關聯對象將被驗證。默認情況下,這是false:當保存此對象時,新的關聯對象不會被驗證。
4.1.2.11 :optional
如果將optional選項設置為true,則不會驗證關聯對象的存在。默認情況下,此選項設置為false。
4.1.3 belongs_to的作用域
有時你可能希望自定義belongs_to使用的查詢。你可以通過作用域塊來實現這些自定義。例如:
class Book < ApplicationRecord
  belongs_to :author, -> { where active: true }
end
你可以在作用域塊內使用任何標準的查詢方法。以下是其中幾個方法的討論:
whereincludesreadonlyselect
4.1.3.1 where
where方法允許你指定關聯對象必須滿足的條件。
class Book < ApplicationRecord
  belongs_to :author, -> { where active: true }
end
4.1.3.2 includes
你可以使用includes方法來指定當使用此關聯時應該預先加載的二級關聯。例如,考慮以下模型:
class Chapter < ApplicationRecord
  belongs_to :book
end

class Book < ApplicationRecord
  belongs_to :author
  has_many :chapters
end

class Author < ApplicationRecord
  has_many :books
end
如果你經常直接從章節中檢索作者(@chapter.book.author),那麼你可以通過在章節到書籍的關聯中包含作者來使你的代碼更高效:
class Chapter < ApplicationRecord
  belongs_to :book, -> { includes :author }
end

class Book < ApplicationRecord
  belongs_to :author
  has_many :chapters
end

class Author < ApplicationRecord
  has_many :books
end
注意:對於即時關聯,不需要使用includes - 也就是說,如果你有Book belongs_to :author,則在需要時作者會自動預先加載。
4.1.3.3 readonly
如果使用readonly,則通過關聯檢索的關聯對象將是只讀的。
4.1.3.4 select
select 方法允許你覆寫用於擷取關聯物件資料的 SQL SELECT 子句。預設情況下,Rails 會擷取所有欄位。
提示:如果你在 belongs_to 關聯上使用 select 方法,你也應該設定 :foreign_key 選項以確保正確的結果。
4.1.4 是否存在任何關聯物件?
你可以使用 association.nil? 方法來判斷是否存在任何關聯物件:
if @book.author.nil?
  @msg = "找不到此書的作者"
end
4.1.5 何時會儲存物件?
將物件指派給 belongs_to 關聯並不會自動儲存該物件。它也不會儲存關聯的物件。
4.2 has_one 關聯參考
has_one 關聯建立了一對一的對應關係。在資料庫術語中,這個關聯表示另一個類別包含外鍵。如果這個類別包含外鍵,則應該使用 belongs_to。
4.2.1 has_one 新增的方法
當你聲明一個 has_one 關聯時,聲明類別會自動獲得與該關聯相關的 6 個方法:
associationassociation=(associate)build_association(attributes = {})create_association(attributes = {})create_association!(attributes = {})reload_associationreset_association
在這些方法中,association 會被替換為傳遞給 has_one 的第一個參數的符號。例如,給定以下聲明:
class Supplier < ApplicationRecord
  has_one :account
end
Supplier 模型的每個實例都會擁有這些方法:
accountaccount=build_accountcreate_accountcreate_account!reload_accountreset_account
注意:在初始化新的 has_one 或 belongs_to 關聯時,你必須使用 build_ 前綴來建立關聯,而不是用於 has_many 或 has_and_belongs_to_many 關聯的 association.build 方法。要創建一個關聯,請使用 create_ 前綴。
4.2.1.1 association
association 方法返回關聯的物件,如果沒有找到關聯的物件,則返回 nil。
@account = @supplier.account
如果已經從資料庫擷取了該物件的關聯物件,則會返回緩存的版本。要覆蓋此行為(並強制從資料庫讀取),請在父物件上調用 #reload_association。
@account = @supplier.reload_account
要卸載關聯物件的緩存版本(強制下一次訪問(如果有的話)從資料庫查詢),請在父物件上調用 #reset_association。
@supplier.reset_account
4.2.1.2 association=(associate)
association= 方法將關聯的物件指派給此物件。在幕後,這意味著從此物件中提取主鍵並將關聯物件的外鍵設置為相同的值。
@supplier.account = @account
4.2.1.3 build_association(attributes = {})
build_association 方法返回關聯類型的新物件。該物件將從傳遞的屬性實例化,並通過其外鍵設置連結,但關聯物件尚未儲存。
@account = @supplier.build_account(terms: "Net 30")
4.2.1.4 create_association(attributes = {})
create_association 方法返回關聯類型的新物件。該物件將從傳遞的屬性實例化,通過其外鍵設置連結,並且一旦通過關聯模型上指定的所有驗證,關聯物件將被儲存。
@account = @supplier.create_account(terms: "Net 30")
4.2.1.5 create_association!(attributes = {})
與上面的 create_association 相同,但如果記錄無效,則引發 ActiveRecord::RecordInvalid。
4.2.2 has_one 的選項
雖然 Rails 使用智能的預設值,在大多數情況下都能很好地工作,但有時你可能想要自定義 has_one 關聯參考的行為。通過在創建關聯時傳遞選項,可以輕鬆實現這些自定義。例如,此關聯使用了兩個這樣的選項:
class Supplier < ApplicationRecord
  has_one :account, class_name: "Billing", dependent: :nullify
end
has_one 關聯支持以下選項:
:as:autosave:class_name:dependent:foreign_key:inverse_of:primary_key:source:source_type:through:touch:validate
4.2.2.1 :as
設置 :as 選項表示這是一個多態關聯。多態關聯在本指南的前面部分中有詳細討論。
4.2.2.2 :autosave
如果將 :autosave 選項設置為 true,則 Rails 會在保存父物件時保存任何已加載的關聯成員並銷毀標記為銷毀的成員。將 :autosave 設置為 false 不等於不設置 :autosave 選項。如果沒有出現 :autosave 選項,則新的關聯物件將被保存,但更新的關聯物件將不會被保存。
4.2.2.3 :class_name
如果其他模型的名稱無法從關聯名稱中推斷出來,您可以使用 :class_name 選項來提供模型名稱。例如,如果供應商有一個帳戶,但實際包含帳戶的模型的名稱是 Billing,您可以這樣設置:
class Supplier < ApplicationRecord
  has_one :account, class_name: "Billing"
end
4.2.2.4 :dependent
控制當擁有者被刪除時,關聯對象會發生什麼:
:destroy導致關聯對象也被刪除:delete導致關聯對象直接從數據庫中刪除(因此不會執行回調):destroy_async:當對象被刪除時,會將ActiveRecord::DestroyAssociationAsyncJob作業加入隊列,該作業將調用其關聯對象的 destroy 方法。必須設置 Active Job 才能正常運作。如果關聯由數據庫的外鍵約束支持,請勿使用此選項。外鍵約束操作將在刪除擁有者的同一事務中執行。:nullify導致外鍵設置為NULL。對於多態關聯,多態類型列也將被設置為 null。不執行回調。:restrict_with_exception如果存在關聯記錄,則引發ActiveRecord::DeleteRestrictionError異常:restrict_with_error如果存在關聯對象,則將錯誤添加到擁有者
對於具有 NOT NULL 數據庫約束的關聯,不要設置或保留 :nullify 選項是必要的。如果不將 dependent 設置為 destroy 這樣的關聯,您將無法更改關聯對象,因為初始關聯對象的外鍵將被設置為不允許的 NULL 值。
4.2.2.5 :foreign_key
按照慣例,Rails 假設在其他模型上保存外鍵的列的名稱是此模型的名稱加上後綴 _id。 :foreign_key 選項允許您直接設置外鍵的名稱:
class Supplier < ApplicationRecord
  has_one :account, foreign_key: "supp_id"
end
提示:無論如何,Rails 不會為您創建外鍵列。您需要在遷移的一部分中明確定義它們。
4.2.2.6 :inverse_of
inverse_of 選項指定與此關聯相反的 belongs_to 關聯的名稱。有關詳細信息,請參閱雙向關聯部分。
class Supplier < ApplicationRecord
  has_one :account, inverse_of: :supplier
end

class Account < ApplicationRecord
  belongs_to :supplier, inverse_of: :account
end
4.2.2.7 :primary_key
按照慣例,Rails 假設用於保存此模型的主鍵的列是 id。您可以使用 :primary_key 選項覆蓋此行為並明確指定主鍵。
4.2.2.8 :source
:source 選項指定 has_one :through 關聯的源關聯名稱。
4.2.2.9 :source_type
:source_type 選項指定 has_one :through 關聯的源關聯類型,該關聯通過多態關聯進行。
class Author < ApplicationRecord
  has_one :book
  has_one :hardback, through: :book, source: :format, source_type: "Hardback"
  has_one :dust_jacket, through: :hardback
end

class Book < ApplicationRecord
  belongs_to :format, polymorphic: true
end

class Paperback < ApplicationRecord; end

class Hardback < ApplicationRecord
  has_one :dust_jacket
end

class DustJacket < ApplicationRecord; end
4.2.2.10 :through
:through 選項指定一個聯接模型,通過該模型執行查詢。有關 has_one :through 關聯的詳細信息,請參閱本指南的早期部分。
4.2.2.11 :touch
如果將 :touch 選項設置為 true,則在保存或刪除此對象時,關聯對象上的 updated_at 或 updated_on 時間戳將被設置為當前時間:
class Supplier < ApplicationRecord
  has_one :account, touch: true
end

class Account < ApplicationRecord
  belongs_to :supplier
end
在這種情況下,保存或刪除供應商將更新關聯帳戶上的時間戳。您還可以指定要更新的特定時間戳屬性:
class Supplier < ApplicationRecord
  has_one :account, touch: :suppliers_updated_at
end
4.2.2.12 :validate
如果將 :validate 選項設置為 true,則在保存此對象時,新的關聯對象將進行驗證。默認情況下,這是 false:在保存此對象時,新的關聯對象不會進行驗證。
4.2.3 has_one 的作用域
有時您可能希望自定義 has_one 使用的查詢。可以通過作用域塊來實現此類自定義。例如:
class Supplier < ApplicationRecord
  has_one :account, -> { where active: true }
end
您可以在scope區塊內使用任何標準的查詢方法。以下是討論過的幾種方法:
whereincludesreadonlyselect
4.2.3.1 where
where方法允許您指定關聯對象必須滿足的條件。
class Supplier < ApplicationRecord
  has_one :account, -> { where "confirmed = 1" }
end
4.2.3.2 includes
您可以使用includes方法來指定當使用此關聯時應該預先加載的二階關聯。例如,考慮以下模型:
class Supplier < ApplicationRecord
  has_one :account
end

class Account < ApplicationRecord
  belongs_to :supplier
  belongs_to :representative
end

class Representative < ApplicationRecord
  has_many :accounts
end
如果您經常直接從供應商檢索代表(@supplier.account.representative),則可以通過在供應商到帳戶的關聯中包含代表來使代碼更高效:
class Supplier < ApplicationRecord
  has_one :account, -> { includes :representative }
end

class Account < ApplicationRecord
  belongs_to :supplier
  belongs_to :representative
end

class Representative < ApplicationRecord
  has_many :accounts
end
4.2.3.3 readonly
如果使用readonly方法,則在通過關聯檢索時,關聯對象將為只讀。
4.2.3.4 select
select方法允許您覆蓋用於檢索有關關聯對象的SQL SELECT子句。默認情況下,Rails檢索所有列。
4.2.4 是否存在任何關聯對象?
您可以使用association.nil?方法來查看是否存在任何關聯對象:
if @supplier.account.nil?
  @msg = "找不到此供應商的帳戶"
end
4.2.5 何時保存對象?
當您將對象分配給has_one關聯時,該對象會自動保存(以更新其外鍵)。此外,任何被替換的對象也會自動保存,因為它的外鍵也會改變。
如果由於驗證錯誤而導致這些保存失敗,則賦值語句將返回false,並且賦值本身將被取消。
如果父對象(聲明has_one關聯的對象)未保存(即new_record?返回true),則子對象不會保存。它們將在父對象保存時自動保存。
如果要將對象分配給has_one關聯而不保存對象,請使用build_association方法。
4.3 has_many關聯參考
has_many關聯創建了與另一個模型的一對多關係。在數據庫術語中,此關聯表示其他類將具有引用到此類實例的外鍵。
4.3.1 has_many添加的方法
當您聲明has_many關聯時,聲明類會自動獲得與該關聯相關的17個方法:
collectioncollection<<(object, ...)collection.delete(object, ...)collection.destroy(object, ...)collection=(objects)collection_singular_idscollection_singular_ids=(ids)collection.clearcollection.empty?collection.sizecollection.find(...)collection.where(...)collection.exists?(...)collection.build(attributes = {})collection.create(attributes = {})collection.create!(attributes = {})collection.reload
在所有這些方法中,collection被替換為傳遞給has_many的第一個參數的符號,collection_singular則被替換為該符號的單數形式。例如,給定以下聲明:
class Author < ApplicationRecord
  has_many :books
end
Author模型的每個實例都將擁有這些方法:
books
books<<(object, ...)
books.delete(object, ...)
books.destroy(object, ...)
books=(objects)
book_ids
book_ids=(ids)
books.clear
books.empty?
books.size
books.find(...)
books.where(...)
books.exists?(...)
books.build(attributes = {}, ...)
books.create(attributes = {})
books.create!(attributes = {})
books.reload
4.3.1.1 collection
collection方法返回所有關聯對象的Relation。如果沒有關聯對象,則返回一個空的Relation。
@books = @author.books
4.3.1.2 collection<<(object, ...)
collection<<方法通過將其外鍵設置為調用模型的主鍵,將一個或多個對象添加到集合中。
@author.books << @book1
4.3.1.3 collection.delete(object, ...)
collection.delete方法通過將其外鍵設置為NULL,從集合中刪除一個或多個對象。
@author.books.delete(@book1)
警告:如果與dependent: :destroy關聯,對象將被銷毀;如果與dependent: :delete_all關聯,對象將被刪除。
4.3.1.4 collection.destroy(object, ...)
collection.destroy方法通過在每個對象上運行destroy,從集合中刪除一個或多個對象。
@author.books.destroy(@book1)
警告:對象將始終從數據庫中刪除,忽略dependent選項。
4.3.1.5 collection=(objects)
collection=方法通過添加和刪除來使集合只包含提供的對象。更改將持久保存到數據庫中。
4.3.1.6 collection_singular_ids
collection_singular_ids 方法返回集合中物件的 id 陣列。
@book_ids = @author.book_ids
4.3.1.7 collection_singular_ids=(ids)
collection_singular_ids= 方法通過添加和刪除的方式,使集合只包含由提供的主鍵值識別的物件。更改將持久保存到數據庫中。
4.3.1.8 collection.clear
collection.clear 方法根據 dependent 選項指定的策略從集合中刪除所有物件。如果沒有給定選項,則按照默認策略進行操作。對於 has_many :through 關聯,默認策略是 delete_all,對於 has_many 關聯,默認策略是將外鍵設置為 NULL。
@author.books.clear
警告:如果物件與 dependent: :destroy 或 dependent: :destroy_async 相關聯,則它們將被刪除,就像 dependent: :delete_all 一樣。
4.3.1.9 collection.empty?
collection.empty? 方法如果集合不包含任何相關聯的物件,則返回 true。
<% if @author.books.empty? %>
  找不到書籍
<% end %>
4.3.1.10 collection.size
collection.size 方法返回集合中物件的數量。
@book_count = @author.books.size
4.3.1.11 collection.find(...)
collection.find 方法在集合的表中查找物件。
@available_book = @author.books.find(1)
4.3.1.12 collection.where(...)
collection.where 方法根據提供的條件在集合中查找物件,但物件是惰性加載的,這意味著只有在訪問物件時才會查詢數據庫。
@available_books = author.books.where(available: true) # 尚未查詢數據庫
@available_book = @available_books.first # 現在將查詢數據庫
4.3.1.13 collection.exists?(...)
collection.exists? 方法檢查集合的表中是否存在滿足提供的條件的物件。
4.3.1.14 collection.build(attributes = {})
collection.build 方法返回關聯類型的一個或多個新物件。物件將從傳遞的屬性實例化,並且通過它們的外鍵建立關聯,但相關聯的物件尚未保存。
@book = author.books.build(published_at: Time.now,
                            book_number: "A12345")

@books = author.books.build([
  { published_at: Time.now, book_number: "A12346" },
  { published_at: Time.now, book_number: "A12347" }
])
4.3.1.15 collection.create(attributes = {})
collection.create 方法返回關聯類型的一個或多個新物件。物件將從傳遞的屬性實例化,通過它們的外鍵建立關聯,並且一旦通過關聯模型上指定的所有驗證,相關聯的物件將被保存。
@book = author.books.create(published_at: Time.now,
                             book_number: "A12345")

@books = author.books.create([
  { published_at: Time.now, book_number: "A12346" },
  { published_at: Time.now, book_number: "A12347" }
])
4.3.1.16 collection.create!(attributes = {})
與上面的 collection.create 相同,但如果記錄無效,則引發 ActiveRecord::RecordInvalid。
4.3.1.17 collection.reload
collection.reload 方法返回所有相關聯物件的關聯,強制從數據庫讀取。如果沒有相關聯的物件,則返回一個空的關聯。
@books = author.books.reload
4.3.2 has_many 的選項
雖然 Rails 使用智能默認值,在大多數情況下都能很好地工作,但有時您可能希望自定義 has_many 關聯的行為。通過在創建關聯時傳遞選項,可以輕鬆實現這些自定義。例如,此關聯使用了兩個這樣的選項:
class Author < ApplicationRecord
  has_many :books, dependent: :delete_all, validate: false
end
has_many 關聯支持以下選項:
:as:autosave:class_name:counter_cache:dependent:foreign_key:inverse_of:primary_key:source:source_type:through:validate
4.3.2.1 :as
設置 :as 選項表示這是一個多態關聯,如本指南前面所討論的。
4.3.2.2 :autosave
如果將 :autosave 選項設置為 true,則 Rails 將在保存父對象時保存任何已加載的關聯成員並銷毀標記為銷毀的成員。將 :autosave 設置為 false 不等於不設置 :autosave 選項。如果不存在 :autosave 選項,則新的相關聯物件將被保存,但更新的相關聯物件將不會被保存。
4.3.2.3 :class_name
如果其他模型的名稱無法從關聯名稱中推斷出來,則可以使用 :class_name 選項提供模型名稱。例如,如果作者有多本書,但包含書籍的實際模型的名稱是 Transaction,則可以這樣設置:
class Author < ApplicationRecord
  has_many :books, class_name: "Transaction"
end
4.3.2.4 :counter_cache(計數緩存)
此選項可用於配置自定義的 :counter_cache 名稱。只有在自定義了 belongs_to 關聯 的 :counter_cache 名稱時才需要使用此選項。
4.3.2.5 :dependent(關聯物件的相依性)
控制當擁有者被刪除時,關聯物件會發生什麼:
:destroy導致所有關聯物件也被刪除:delete_all直接從數據庫中刪除所有關聯物件(不會執行回調):destroy_async:當物件被刪除時,會將一個ActiveRecord::DestroyAssociationAsyncJob作業加入佇列,該作業將調用其關聯物件的 destroy 方法。必須設置 Active Job 才能使其正常運作。:nullify將外鍵設置為NULL。對於多態關聯,多態類型列也會被設置為 null。不執行回調。:restrict_with_exception如果有任何關聯記錄,則引發ActiveRecord::DeleteRestrictionError異常:restrict_with_error如果有任何關聯物件,則將錯誤添加到擁有者
:destroy 和 :delete_all 選項還會影響 collection.delete 和 collection= 方法的語義,當從集合中刪除關聯物件時,它們會將其銷毀。
4.3.2.6 :foreign_key(外鍵)
按照慣例,Rails 假設在其他模型上用於保存外鍵的列的名稱是該模型的名稱加上後綴 _id。:foreign_key 選項允許您直接設置外鍵的名稱:
class Author < ApplicationRecord
  has_many :books, foreign_key: "cust_id"
end
提示:無論如何,Rails 不會為您創建外鍵列。您需要在遷移的一部分中明確定義它們。
4.3.2.7 :inverse_of(反向關聯)
:inverse_of 選項指定與此關聯相反的 belongs_to 關聯的名稱。有關詳細信息,請參見 雙向關聯 部分。
class Author < ApplicationRecord
  has_many :books, inverse_of: :author
end

class Book < ApplicationRecord
  belongs_to :author, inverse_of: :books
end
4.3.2.8 :primary_key(主鍵)
按照慣例,Rails 假設用於保存關聯的主鍵的列是 id。您可以使用 :primary_key 選項覆蓋這一默認行為,並明確指定主鍵。
假設 users 表的主鍵是 id,但它還有一個 guid 列。要求是 todos 表應將 guid 列的值作為外鍵,而不是 id 值。可以像這樣實現:
class User < ApplicationRecord
  has_many :todos, primary_key: :guid
end
現在,如果我們執行 @todo = @user.todos.create,那麼 @todo 記錄的 user_id 值將是 @user 的 guid 值。
4.3.2.9 :source(來源關聯)
:source 選項指定 has_many :through 關聯的來源關聯名稱。只有在無法從關聯名稱自動推斷出來源關聯名稱時,才需要使用此選項。
4.3.2.10 :source_type(來源關聯類型)
:source_type 選項指定通過多態關聯進行的 has_many :through 關聯的來源關聯類型。
class Author < ApplicationRecord
  has_many :books
  has_many :paperbacks, through: :books, source: :format, source_type: "Paperback"
end

class Book < ApplicationRecord
  belongs_to :format, polymorphic: true
end

class Hardback < ApplicationRecord; end
class Paperback < ApplicationRecord; end
4.3.2.11 :through(通過關聯)
:through 選項指定一個聯接模型,通過該模型執行查詢。has_many :through 關聯提供了一種實現多對多關聯的方法,如本指南的 前面部分 中所討論的。
4.3.2.12 :validate(驗證)
如果將 :validate 選項設置為 false,則每當保存此物件時,新的關聯物件將不會進行驗證。默認情況下,此選項為 true:保存此物件時,新的關聯物件將進行驗證。
4.3.3 has_many 的範圍
有時您可能希望自定義 has_many 使用的查詢。可以通過範圍塊來實現此類自定義。例如:
class Author < ApplicationRecord
  has_many :books, -> { where processed: true }
end
您可以在範圍塊內使用任何標準的 查詢方法。以下方法在下面進行了討論:
whereextendinggroupincludeslimitoffsetorderreadonlyselectdistinct
4.3.3.1 where(條件)
where 方法允許您指定關聯物件必須滿足的條件。
class Author < ApplicationRecord
  has_many :confirmed_books, -> { where "confirmed = 1" },
    class_name: "Book"
end
您還可以通過哈希來設置條件:
class Author < ApplicationRecord
  has_many :confirmed_books, -> { where confirmed: true },
    class_name: "Book"
end
如果您使用哈希風格的where選項,則通過此關聯創建的記錄將自動使用該哈希進行範圍限定。在這種情況下,使用@author.confirmed_books.create或@author.confirmed_books.build將創建具有值為true的已確認列的書籍。
4.3.3.2 extending
extending方法指定要擴展關聯代理的命名模塊。關聯擴展在本指南的後面部分詳細討論。
4.3.3.3 group
group方法提供一個屬性名稱,用於通過在查詢SQL中使用GROUP BY子句對結果集進行分組。
class Author < ApplicationRecord
  has_many :chapters, -> { group 'books.id' },
                      through: :books
end
4.3.3.4 includes
您可以使用includes方法來指定在使用此關聯時應該預先加載的二級關聯。例如,考慮以下模型:
class Author < ApplicationRecord
  has_many :books
end

class Book < ApplicationRecord
  belongs_to :author
  has_many :chapters
end

class Chapter < ApplicationRecord
  belongs_to :book
end
如果您經常直接從作者中檢索章節(@author.books.chapters),則可以通過在從作者到書籍的關聯中包含章節來使代碼更高效:
class Author < ApplicationRecord
  has_many :books, -> { includes :chapters }
end

class Book < ApplicationRecord
  belongs_to :author
  has_many :chapters
end

class Chapter < ApplicationRecord
  belongs_to :book
end
4.3.3.5 limit
limit方法允許您限制通過關聯獲取的對象的總數量。
class Author < ApplicationRecord
  has_many :recent_books,
    -> { order('published_at desc').limit(100) },
    class_name: "Book"
end
4.3.3.6 offset
offset方法允許您指定從關聯中獲取對象的起始偏移量。例如,-> { offset(11) }將跳過前11條記錄。
4.3.3.7 order
order方法指定將接收到的關聯對象的順序(使用SQL ORDER BY子句的語法)。
class Author < ApplicationRecord
  has_many :books, -> { order "date_confirmed DESC" }
end
4.3.3.8 readonly
如果使用readonly方法,則在通過關聯檢索時,關聯對象將是只讀的。
4.3.3.9 select
select方法允許您覆蓋用於檢索有關關聯對象的數據的SQL SELECT子句。默認情況下,Rails檢索所有列。
警告:如果指定自己的select,請確保包含關聯模型的主鍵和外鍵列。如果不包含,Rails將拋出錯誤。
4.3.3.10 distinct
使用distinct方法使集合中不包含重複的記錄。這在與:through選項一起使用時非常有用。
class Person < ApplicationRecord
  has_many :readings
  has_many :articles, through: :readings
end
irb> person = Person.create(name: 'John')
irb> article = Article.create(name: 'a1')
irb> person.articles << article
irb> person.articles << article
irb> person.articles.to_a
=> [#<Article id: 5, name: "a1">, #<Article id: 5, name: "a1">]
irb> Reading.all.to_a
=> [#<Reading id: 12, person_id: 5, article_id: 5>, #<Reading id: 13, person_id: 5, article_id: 5>]
在上面的例子中,有兩個讀物,person.articles將它們都顯示出來,即使這些記錄指向同一篇文章。
現在設置distinct:
class Person
  has_many :readings
  has_many :articles, -> { distinct }, through: :readings
end
irb> person = Person.create(name: 'Honda')
irb> article = Article.create(name: 'a1')
irb> person.articles << article
irb> person.articles << article
irb> person.articles.to_a
=> [#<Article id: 7, name: "a1">]
irb> Reading.all.to_a
=> [#<Reading id: 16, person_id: 7, article_id: 7>, #<Reading id: 17, person_id: 7, article_id: 7>]
在上面的例子中,仍然有兩個讀物。但是,person.articles只顯示一篇文章,因為集合只加載唯一的記錄。
如果您希望在插入時確保持久化關聯中的所有記錄都是唯一的(這樣您就可以確保在檢查關聯時永遠不會找到重複的記錄),您應該在表本身上添加唯一索引。例如,如果您有一個名為readings的表,並且希望確保文章只能添加到一個人一次,您可以在遷移中添加以下內容:
add_index :readings, [:person_id, :article_id], unique: true
一旦您擁有這個唯一索引,嘗試將文章添加到一個人兩次將引發ActiveRecord::RecordNotUnique錯誤:
irb> person = Person.create(name: 'Honda')
irb> article = Article.create(name: 'a1')
irb> person.articles << article
irb> person.articles << article
ActiveRecord::RecordNotUnique
請注意,使用include?進行唯一性檢查會受到競爭條件的影響。不要嘗試使用include?來強制關聯中的不同性。例如,使用上面的文章示例,以下代碼將存在競爭條件,因為多個用戶可能同時嘗試進行此操作:
person.articles << article unless person.articles.include?(article)
4.3.4 何時保存對象?
當您將對象賦值給has_many關聯時,該對象會自動保存(以更新其外鍵)。如果您在一個語句中賦值多個對象,則它們都會被保存。
如果由於驗證錯誤而導致任何保存失敗,則賦值語句將返回false,並且賦值本身將被取消。
如果父對象(聲明has_many關聯的對象)未保存(即new_record?返回true),則在添加它們時不會保存子對象。當保存父對象時,所有未保存的關聯成員將自動保存。
如果您想將對象賦值給has_many關聯而不保存對象,請使用collection.build方法。
4.4 has_and_belongs_to_many關聯參考
has_and_belongs_to_many關聯創建了與另一個模型的多對多關係。在數據庫術語中,這通過一個包含對每個類的外鍵的中間連接表來關聯兩個類。
4.4.1 has_and_belongs_to_many添加的方法
當您聲明一個has_and_belongs_to_many關聯時,聲明類會自動獲得與關聯相關的幾個方法:
collectioncollection<<(object, ...)collection.delete(object, ...)collection.destroy(object, ...)collection=(objects)collection_singular_idscollection_singular_ids=(ids)collection.clearcollection.empty?collection.sizecollection.find(...)collection.where(...)collection.exists?(...)collection.build(attributes = {})collection.create(attributes = {})collection.create!(attributes = {})collection.reload
在所有這些方法中,collection被替換為作為has_and_belongs_to_many的第一個參數傳遞的符號,而collection_singular則被替換為該符號的單數形式。例如,給定以下聲明:
class Part < ApplicationRecord
  has_and_belongs_to_many :assemblies
end
Part模型的每個實例將具有以下方法:
assemblies
assemblies<<(object, ...)
assemblies.delete(object, ...)
assemblies.destroy(object, ...)
assemblies=(objects)
assembly_ids
assembly_ids=(ids)
assemblies.clear
assemblies.empty?
assemblies.size
assemblies.find(...)
assemblies.where(...)
assemblies.exists?(...)
assemblies.build(attributes = {}, ...)
assemblies.create(attributes = {})
assemblies.create!(attributes = {})
assemblies.reload
4.4.1.1 附加列方法
如果has_and_belongs_to_many關聯的連接表除了兩個外鍵之外還有其他列,這些列將作為屬性添加到通過該關聯檢索的記錄中。帶有附加屬性的記錄始終是只讀的,因為Rails無法保存對這些屬性的更改。
警告:在has_and_belongs_to_many關聯中使用連接表上的額外屬性已被棄用。如果您需要在連接兩個模型的多對多關係的表上使用這種複雜行為,應該使用has_many :through關聯而不是has_and_belongs_to_many。
4.4.1.2 collection
collection方法返回所有關聯對象的Relation。如果沒有關聯對象,則返回一個空的Relation。
@assemblies = @part.assemblies
4.4.1.3 collection<<(object, ...)
collection<<方法通過在連接表中創建記錄,將一個或多個對象添加到集合中。
@part.assemblies << @assembly1
注意:此方法別名為collection.concat和collection.push。
4.4.1.4 collection.delete(object, ...)
collection.delete方法通過在連接表中刪除記錄,從集合中刪除一個或多個對象。這不會銷毀對象。
@part.assemblies.delete(@assembly1)
4.4.1.5 collection.destroy(object, ...)
collection.destroy方法通過在連接表中刪除記錄,從集合中刪除一個或多個對象。這不會銷毀對象。
@part.assemblies.destroy(@assembly1)
4.4.1.6 collection=(objects)
collection=方法通過添加和刪除適當的方式,使集合只包含提供的對象。更改將持久保存到數據庫中。
4.4.1.7 collection_singular_ids
collection_singular_ids方法返回集合中對象的id數組。
@assembly_ids = @part.assembly_ids
4.4.1.8 collection_singular_ids=(ids)
collection_singular_ids=方法通過添加和刪除適當的方式,使集合只包含由提供的主鍵值識別的對象。更改將持久保存到數據庫中。
4.4.1.9 collection.clear
collection.clear 方法通過從連接表中刪除行來從集合中刪除每個對象。這不會銷毀相關的對象。
4.4.1.10 collection.empty?
collection.empty? 方法如果集合不包含任何相關的對象,則返回 true。
<% if @part.assemblies.empty? %>
  This part is not used in any assemblies
<% end %>
4.4.1.11 collection.size
collection.size 方法返回集合中對象的數量。
@assembly_count = @part.assemblies.size
4.4.1.12 collection.find(...)
collection.find 方法在集合的表中查找對象。
@assembly = @part.assemblies.find(1)
4.4.1.13 collection.where(...)
collection.where 方法根據提供的條件在集合中查找對象,但對象是惰性加載的,這意味著只有在訪問對象時才會查詢數據庫。
@new_assemblies = @part.assemblies.where("created_at > ?", 2.days.ago)
4.4.1.14 collection.exists?(...)
collection.exists? 方法檢查集合的表中是否存在滿足提供的條件的對象。
4.4.1.15 collection.build(attributes = {})
collection.build 方法返回與關聯類型相關的新對象。該對象將從傳遞的屬性實例化,並創建通過連接表的鏈接,但相關的對象尚未保存。
@assembly = @part.assemblies.build({ assembly_name: "Transmission housing" })
4.4.1.16 collection.create(attributes = {})
collection.create 方法返回與關聯類型相關的新對象。該對象將從傳遞的屬性實例化,創建通過連接表的鏈接,並且一旦通過關聯模型上指定的所有驗證,相關的對象將被保存。
@assembly = @part.assemblies.create({ assembly_name: "Transmission housing" })
4.4.1.17 collection.create!(attributes = {})
與 collection.create 相同,但如果記錄無效,則引發 ActiveRecord::RecordInvalid。
4.4.1.18 collection.reload
collection.reload 方法返回所有相關對象的關聯,強制進行數據庫讀取。如果沒有相關的對象,則返回一個空的關聯。
@assemblies = @part.assemblies.reload
4.4.2 has_and_belongs_to_many 的選項
雖然 Rails 使用智能默認值,在大多數情況下都能很好地工作,但有時您可能希望自定義 has_and_belongs_to_many 關聯的行為。通過在創建關聯時傳遞選項,可以輕鬆完成這些自定義。例如,此關聯使用了兩個這樣的選項:
class Parts < ApplicationRecord
  has_and_belongs_to_many :assemblies, -> { readonly },
                                       autosave: true
end
has_and_belongs_to_many 關聯支持以下選項:
:association_foreign_key:autosave:class_name:foreign_key:join_table:validate
4.4.2.1 :association_foreign_key
按照慣例,Rails 假設連接表中用於保存指向其他模型的外鍵的列是該模型的名稱加上後綴 _id。:association_foreign_key 選項允許您直接設置外鍵的名稱:
提示:在設置多對多自關聯時,:foreign_key 和 :association_foreign_key 選項非常有用。例如:
class User < ApplicationRecord
  has_and_belongs_to_many :friends,
      class_name: "User",
      foreign_key: "this_user_id",
      association_foreign_key: "other_user_id"
end
4.4.2.2 :autosave
如果將 :autosave 選項設置為 true,則在保存父對象時,Rails 將保存任何已加載的關聯成員並銷毀標記為銷毀的成員。將 :autosave 設置為 false 不等於不設置 :autosave 選項。如果不存在 :autosave 選項,則新的關聯對象將被保存,但更新的關聯對象將不會被保存。
4.4.2.3 :class_name
如果無法從關聯名稱推斷出其他模型的名稱,可以使用 :class_name 選項提供模型名稱。例如,如果一個零件有多個組件,但包含組件的實際模型的名稱是 Gadget,則可以這樣設置:
class Parts < ApplicationRecord
  has_and_belongs_to_many :assemblies, class_name: "Gadget"
end
4.4.2.4 :foreign_key
按照慣例,Rails 假設連接表中用於保存指向此模型的外鍵的列是此模型的名稱加上後綴 _id。:foreign_key 選項允許您直接設置外鍵的名稱:
class User < ApplicationRecord
  has_and_belongs_to_many :friends,
      class_name: "User",
      foreign_key: "this_user_id",
      association_foreign_key: "other_user_id"
end
4.4.2.5 :join_table
如果基於字母順序的默認連接表名稱不符合您的要求,可以使用 :join_table 選項覆蓋默認值。
4.4.2.6 :validate
如果將 :validate 選項設置為 false,則每次保存此對象時,新的關聯對象將不會進行驗證。默認情況下,此選項為 true:保存此對象時,新的關聯對象將進行驗證。
4.4.3 has_and_belongs_to_many 的範圍
有時您可能希望自定義 has_and_belongs_to_many 使用的查詢。可以通過範圍塊來實現此類自定義。例如:
class Parts < ApplicationRecord
  has_and_belongs_to_many :assemblies, -> { where active: true }
end
您可以在範圍塊內使用任何標準的查詢方法。以下方法將在下面進行討論:
whereextendinggroupincludeslimitoffsetorderreadonlyselectdistinct
4.4.3.1 where
where 方法允許您指定關聯對象必須滿足的條件。
class Parts < ApplicationRecord
  has_and_belongs_to_many :assemblies,
    -> { where "factory = 'Seattle'" }
end
您也可以通過哈希來設置條件:
class Parts < ApplicationRecord
  has_and_belongs_to_many :assemblies,
    -> { where factory: 'Seattle' }
end
如果使用哈希風格的 where,則通過此關聯創建的記錄將自動使用該哈希進行範圍限制。在這種情況下,使用 @parts.assemblies.create 或 @parts.assemblies.build 將創建 factory 列的值為 "Seattle" 的組件。
4.4.3.2 extending
extending 方法指定要擴展關聯代理的命名模塊。關聯擴展在本指南的後面中進行了詳細討論。
4.4.3.3 group
group 方法提供要使用 GROUP BY 子句按屬性名對結果集進行分組的屬性名。
class Parts < ApplicationRecord
  has_and_belongs_to_many :assemblies, -> { group "factory" }
end
4.4.3.4 includes
您可以使用 includes 方法來指定在使用此關聯時應該預先加載的二階關聯。
4.4.3.5 limit
limit 方法允許您限制通過關聯檢索的對象總數。
class Parts < ApplicationRecord
  has_and_belongs_to_many :assemblies,
    -> { order("created_at DESC").limit(50) }
end
4.4.3.6 offset
offset 方法允許您指定通過關聯檢索對象的起始偏移量。例如,如果設置 offset(11),它將跳過前 11 條記錄。
4.4.3.7 order
order 方法指定接收關聯對象的順序(使用 SQL ORDER BY 子句的語法)。
class Parts < ApplicationRecord
  has_and_belongs_to_many :assemblies,
    -> { order "assembly_name ASC" }
end
4.4.3.8 readonly
如果使用 readonly 方法,則在通過關聯檢索時,關聯對象將為只讀。
4.4.3.9 select
select 方法允許您覆蓋用於檢索有關關聯對象的數據的 SQL SELECT 子句。默認情況下,Rails 檢索所有列。
4.4.3.10 distinct
使用 distinct 方法從集合中刪除重複項。
4.4.4 何時保存對象?
當將對象分配給 has_and_belongs_to_many 關聯時,該對象會自動保存(以更新連接表)。如果在一個語句中分配多個對象,則它們都會被保存。
如果由於驗證錯誤而導致這些保存中的任何一個失敗,則分配語句將返回 false,並且分配本身將被取消。
如果父對象(聲明 has_and_belongs_to_many 關聯的對象)未保存(即 new_record? 返回 true),則在添加時不會保存子對象。當保存父對象時,將自動保存關聯的所有未保存成員。
如果要將對象分配給 has_and_belongs_to_many 關聯而不保存對象,請使用 collection.build 方法。
4.5 關聯回調
普通回調鉤入 Active Record 對象的生命周期,允許您在各個點上使用這些對象。例如,您可以使用 :before_save 回調在對象保存之前觸發某些操作。
關聯回調與普通回調類似,但它們是由集合的生命周期中的事件觸發的。有四個可用的關聯回調:
before_addafter_addbefore_removeafter_remove
您可以通過將選項添加到關聯聲明來定義關聯回調。例如:
class Author < ApplicationRecord
  has_many :books, before_add: :check_credit_limit

  def check_credit_limit(book)
    # ...
  end
end
Rails 將正在添加或刪除的對象傳遞給回調。 您可以將回調函數堆疊在單個事件上,通過將它們作為數組傳遞:
class Author < ApplicationRecord
  has_many :books,
    before_add: [:check_credit_limit, :calculate_shipping_charges]

  def check_credit_limit(book)
    # ...
  end

  def calculate_shipping_charges(book)
    # ...
  end
end
如果before_add回調拋出:abort,則對象不會被添加到集合中。同樣,如果before_remove回調拋出:abort,則對象不會從集合中刪除:
# 如果已達到限制,則不會添加書籍
def check_credit_limit(book)
  throw(:abort) if limit_reached?
end
注意:這些回調僅在通過關聯集合添加或刪除相關對象時調用:
# 觸發`before_add`回調
author.books << book
author.books = [book, book2]

# 不會觸發`before_add`回調
book.update(author_id: 1)
4.6 關聯擴展
您不僅限於Rails自動構建到關聯代理對象中的功能。您還可以通過匿名模塊擴展這些對象,添加新的查找器、創建器或其他方法。例如:
class Author < ApplicationRecord
  has_many :books do
    def find_by_book_prefix(book_number)
      find_by(category_id: book_number[0..2])
    end
  end
end
如果您有一個應該由多個關聯共享的擴展,您可以使用一個命名的擴展模塊。例如:
module FindRecentExtension
  def find_recent
    where("created_at > ?", 5.days.ago)
  end
end

class Author < ApplicationRecord
  has_many :books, -> { extending FindRecentExtension }
end

class Supplier < ApplicationRecord
  has_many :deliveries, -> { extending FindRecentExtension }
end
擴展可以使用proxy_association訪問器的這三個屬性來引用關聯代理的內部:
proxy_association.owner返回關聯所屬的對象。proxy_association.reflection返回描述關聯的反射對象。proxy_association.target返回belongs_to或has_one的關聯對象,或者返回has_many或has_and_belongs_to_many的關聯對象集合。
4.7 使用關聯擁有者進行關聯範圍限定
在需要對關聯範圍進行更多控制的情況下,可以將關聯的擁有者作為單個參數傳遞給範圍塊。但是,作為一個警告,將不再能夠預加載關聯。
class Supplier < ApplicationRecord
  has_one :account, ->(supplier) { where active: supplier.active? }
end
5 單表繼承(STI)
有時候,您可能希望在不同的模型之間共享字段和行為。假設我們有Car、Motorcycle和Bicycle模型。我們希望共享color和price字段以及一些方法,但對於每個模型都有一些特定的行為和分開的控制器。
首先,讓我們生成基礎的Vehicle模型:
$ bin/rails generate model vehicle type:string color:string price:decimal{10.2}
您是否注意到我們添加了一個"type"字段?由於所有模型將保存在單個數據庫表中,Rails將在此列中保存正在保存的模型的名稱。在我們的例子中,可以是"Car"、"Motorcycle"或"Bicycle"。如果表中沒有"type"字段,STI將無法正常工作。
接下來,我們將生成從Vehicle繼承的Car模型。為此,我們可以使用--parent=PARENT選項,它將生成一個從指定父類繼承且不包含等效遷移的模型(因為表已經存在)。
例如,要生成Car模型:
$ bin/rails generate model car --parent=Vehicle
生成的模型將如下所示:
class Car < Vehicle
end
這意味著Vehicle添加的所有行為對於Car也是可用的,例如關聯、公共方法等。
創建一輛汽車將在vehicles表中以"Car"作為type字段保存:
Car.create(color: 'Red', price: 10000)
將生成以下SQL:
INSERT INTO "vehicles" ("type", "color", "price") VALUES ('Car', 'Red', 10000)
查詢汽車記錄將僅搜索是汽車的車輛:
Car.all
將運行類似的查詢:
SELECT "vehicles".* FROM "vehicles" WHERE "vehicles"."type" IN ('Car')
6 委派類型
單表繼承(STI)在子類和其屬性之間幾乎沒有差異時效果最好,但包括您需要在單個表中創建的所有子類的所有屬性。
這種方法的缺點是它會導致表的膨脹。因為它甚至會包含只有特定子類使用的屬性。
在下面的示例中,有兩個Active Record模型繼承自相同的"Entry"類,該類包含subject屬性。
```ruby
Schema: entries[ id, type, subject, created_at, updated_at]
class Entry < ApplicationRecord end
class Comment < Entry end
class Message < Entry end ```
委派類型通過 delegated_type 解決了這個問題。
為了使用委派類型,我們必須以特定的方式建模我們的數據。要求如下:
- 有一個超類,在其表中存儲所有子類共享的屬性。
- 每個子類必須繼承自超類,並為其特定的額外屬性擁有一個單獨的表。
這樣就不需要在單個表中定義意外共享的屬性。
為了將此應用於上面的示例,我們需要重新生成我們的模型。
首先,讓我們生成作為超類的基本 Entry 模型:
$ bin/rails generate model entry entryable_type:string entryable_id:integer
然後,我們將為委派生成新的 Message 和 Comment 模型:
$ bin/rails generate model message subject:string body:string
$ bin/rails generate model comment content:string
運行生成器後,我們應該得到以下模型:
# Schema: entries[ id, entryable_type, entryable_id, created_at, updated_at ]
class Entry < ApplicationRecord
end

# Schema: messages[ id, subject, body, created_at, updated_at ]
class Message < ApplicationRecord
end

# Schema: comments[ id, content, created_at, updated_at ]
class Comment < ApplicationRecord
end
6.1 声明 delegated_type
首先,在超類 Entry 中聲明一個 delegated_type。
class Entry < ApplicationRecord
  delegated_type :entryable, types: %w[ Message Comment ], dependent: :destroy
end
entryable 參數指定用於委派的字段,並將 Message 和 Comment 作為委派類別。
Entry 類有 entryable_type 和 entryable_id 字段。這是在 delegated_type 定義中將名稱 entryable 添加 _type、_id 後綴的字段。
entryable_type 存儲委派對象的子類名稱,entryable_id 存儲委派對象子類的記錄 ID。
接下來,我們必須定義一個模塊來實現這些委派類型,通過將 as: :entryable 參數聲明為 has_one 關聯。
module Entryable
  extend ActiveSupport::Concern

  included do
    has_one :entry, as: :entryable, touch: true
  end
end
然後在子類中包含創建的模塊。
class Message < ApplicationRecord
  include Entryable
end

class Comment < ApplicationRecord
  include Entryable
end
完成此定義後,我們的 Entry 委派者現在提供以下方法:
| 方法 | 返回值 |
|---|---|
Entry#entryable_class |
Message 或 Comment |
Entry#entryable_name |
"message" 或 "comment" |
Entry.messages |
Entry.where(entryable_type: "Message") |
Entry#message? |
當 entryable_type == "Message" 時返回 true |
Entry#message |
當 entryable_type == "Message" 時返回 message 記錄,否則返回 nil |
Entry#message_id |
當 entryable_type == "Message" 時返回 entryable_id,否則返回 nil |
Entry.comments |
Entry.where(entryable_type: "Comment") |
Entry#comment? |
當 entryable_type == "Comment" 時返回 true |
Entry#comment |
當 entryable_type == "Comment" 時返回 comment 記錄,否則返回 nil |
Entry#comment_id |
當 entryable_type == "Comment" 時返回 entryable_id,否則返回 nil |
6.2 對象創建
在創建新的 Entry 對象時,我們可以同時指定 entryable 子類。
Entry.create! entryable: Message.new(subject: "hello!")
6.3 添加進一步的委派
我們可以擴展我們的 Entry 委派者,並通過定義 delegates 並使用多態性來委派給子類。
例如,將 Entry 的 title 方法委派給其子類:
class Entry < ApplicationRecord
  delegated_type :entryable, types: %w[ Message Comment ]
  delegates :title, to: :entryable
end

class Message < ApplicationRecord
  include Entryable

  def title
    subject
  end
end

class Comment < ApplicationRecord
  include Entryable

  def title
    content.truncate(20)
  end
end
回饋
歡迎協助提升本指南的品質。
如果您發現任何錯別字或事實錯誤,請貢獻您的力量。 開始之前,您可以閱讀我們的 文件貢獻 部分。
您也可能會發現不完整的內容或過時的資訊。 請為主要的文件補充任何遺漏的內容。請先檢查 Edge 指南,以確認問題是否已經修復或尚未在主分支上修復。 請參考 Ruby on Rails 指南指引 以了解風格和慣例。
如果您發現需要修復但無法自行修補的問題,請 開啟一個問題。
最後但同樣重要的是,關於 Ruby on Rails 文件的任何討論都非常歡迎在 官方 Ruby on Rails 論壇 上進行。